10 Adorable And Easy Nail Art Ideas To Try Today
Are you looking for ways to elevate your manicure game without spending hours at the salon? Cute easy nail art ideas are the perfect solution for anyone wanting to add a touch of personality to their fingertips without the hassle of complicated techniques. Whether you're a nail art novice or simply short on time, these simple yet stunning designs will have your nails looking fabulous in no time.
Nail art has evolved dramatically over the years, moving from elaborate salon-only designs to accessible DIY creations that anyone can master at home. The beauty of easy nail art lies in its simplicity - you don't need professional skills or expensive tools to create eye-catching designs that express your unique style. From minimalist patterns to playful accents, there's something for everyone in the world of cute nail art.
In this comprehensive guide, we'll explore ten adorable and easy nail art ideas that you can recreate at home, along with tips, tools, and techniques to help you achieve salon-quality results. Get ready to transform your nails from basic to beautiful with these simple yet stunning designs!
Why Simple Nail Art Designs Are Trending
The rise of social media platforms like Instagram and Pinterest has revolutionized the nail art industry, making it more accessible than ever before. According to a recent survey, over 70% of women have tried at least one DIY nail art technique at home, with simple designs being the most popular choice.
The appeal of easy nail art lies in its accessibility and versatility. You don't need to be a professional nail technician to create beautiful designs that last for weeks. Simple techniques like dotting, striping, and color blocking can transform your nails without requiring specialized equipment or extensive practice time.
Moreover, easy nail art designs are perfect for busy individuals who want to maintain a polished appearance without dedicating hours to their beauty routine. These quick and cute ideas allow you to switch up your look frequently, matching your nails to your outfit, mood, or the season without breaking the bank.
Essential Tools and Supplies for DIY Nail Art
Before diving into specific designs, let's discuss the basic tools you'll need to create beautiful nail art at home. Having the right supplies on hand will make the process much smoother and more enjoyable.
Basic Nail Art Toolkit
- Dotting tools: These come in various sizes and are perfect for creating dots, flowers, and other simple shapes
- Striping tape: Thin adhesive tape that helps create clean lines and geometric patterns
- Nail art brushes: Different brush sizes for detailed work and clean-up
- Base and top coat: Essential for protecting your nails and extending the life of your manicure
- Quality nail polish: Invest in good polishes that apply smoothly and last longer
- Nail polish remover and cotton swabs: For clean-up and fixing mistakes
- Quick-dry drops or spray: To speed up drying time and prevent smudging
Optional but Helpful Tools
- Nail tape: For creating perfect French tips and geometric designs
- Stamping kit: For transferring pre-designed patterns onto your nails
- Nail decals and stickers: Instant art without the work
- Matte top coat: For creating different finishes and effects
- Glitter polish: For adding sparkle and dimension
10 Cute Easy Nail Art Ideas You Can Master Today
1. Classic Polka Dots
Polka dots are perhaps the easiest nail art design to master, making them perfect for beginners. This timeless pattern adds a playful touch to any manicure and can be customized with any color combination.
How to create polka dots: Start with a solid base color and let it dry completely. Using a dotting tool or the end of a bobby pin, create evenly spaced dots in a contrasting color. For a more sophisticated look, use metallic dots on a dark background or create a gradient effect with dots in varying sizes.
Tips for perfect polka dots: Practice on a piece of paper first to get comfortable with the dotting motion. Apply gentle pressure to create uniform dots, and work quickly before the polish dries. You can create patterns like rows, clusters, or random arrangements depending on your preference.
2. Minimalist Line Art
Minimalist nail art has taken social media by storm, with clean lines and simple geometric shapes creating an elegant, modern look. This style is perfect for those who prefer understated beauty.
Creating minimalist designs: Use striping tape or a thin nail art brush to create vertical, horizontal, or diagonal lines. You can also create simple shapes like triangles, squares, or half-moons. The key is to keep the design clean and balanced.
Color combinations: Black and white create a classic look, while metallic lines on neutral backgrounds add subtle glamour. For a pop of color, try bright lines on a nude base or complementary colors for a bold statement.
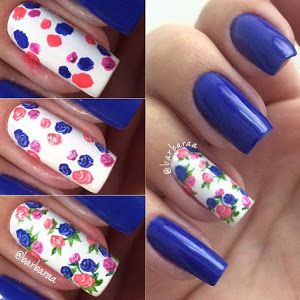
3. Floral Accents
Flowers are a perennial favorite in nail art, and creating simple floral designs is easier than you might think. These cute designs add a feminine touch without being overly complicated.
Simple flower techniques: Create flowers using five dots arranged in a circle, then add a center dot in a contrasting color. You can also use a small brush to paint simple five-petal flowers or create abstract floral patterns with curved lines.
Seasonal variations: Pastel flowers for spring, bright tropical blooms for summer, warm-toned flowers for fall, and icy blue or white flowers for winter. Mix and match different flower sizes and colors for a garden-inspired look.
4. Ombre Gradient
Gradient nails create a beautiful blended effect that looks professional but is surprisingly easy to achieve. This technique works well with any color combination and can be customized for any occasion.
Sponge gradient method: Apply stripes of your chosen colors side by side on a makeup sponge, then dab the sponge onto your nails. The colors will blend together naturally, creating a smooth gradient effect. Finish with a top coat to smooth out the texture.
Color suggestions: Try classic combinations like pink to white, blue to purple, or create seasonal gradients like orange to yellow for fall or red to green for the holidays. You can also create a glitter gradient by concentrating glitter at the tips and fading it toward the base.
5. French Manicure with a Twist
The classic French manicure gets a modern update with these easy variations. These designs maintain the elegance of the traditional French tip while adding creative elements.
Modern French variations: Try colored tips instead of white, create a reverse French with color at the base of the nail, or add a thin line of glitter between the tip and the base color. You can also create a "smiley" French by curving the tip upward at the center.
Easy execution: Use nail guides or striping tape to create clean lines for your French tips. If you struggle with freehand painting, these tools will help you achieve professional-looking results.
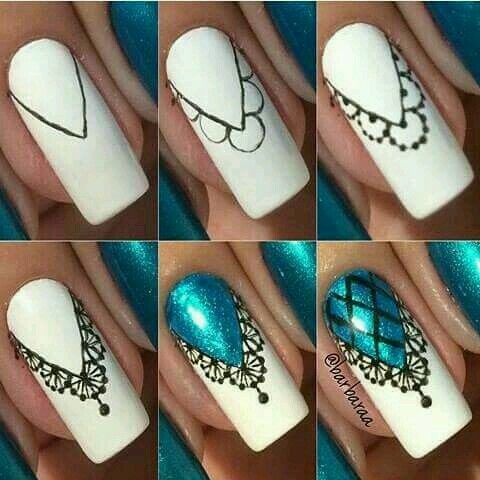
6. Geometric Patterns
Geometric nail art is trendy and versatile, offering endless possibilities for creative expression. These designs can be as simple or complex as you like, making them perfect for all skill levels.
Basic geometric designs: Create triangles, squares, or stripes using striping tape. You can also use tape to create negative space designs by painting over the tape and then removing it to reveal the pattern.
Color blocking: Divide your nail into sections using tape and paint each section a different color. This creates a modern, architectural look that's surprisingly easy to achieve.
7. Glitter Accent Nails
Adding glitter to your manicure is one of the simplest ways to elevate your nail game. Accent nails featuring glitter can transform a basic manicure into something special.
Glitter application techniques: For a subtle sparkle, apply glitter polish to just the tips of your nails. For more impact, create an ombre glitter effect by concentrating glitter at the cuticle and fading it toward the tip. You can also create a glitter gradient by applying multiple coats of glitter polish, concentrating more coats at the base or tip.
Glitter placement: Apply glitter to just one accent nail on each hand for a subtle effect, or create a pattern with glitter on multiple nails. Mix different sizes of glitter for added dimension.
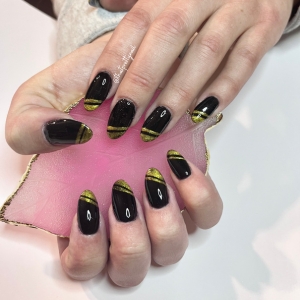
8. Animal Print Accents
Animal prints add a bold, trendy element to your nails without requiring advanced artistic skills. These patterns are surprisingly easy to create and can be customized to suit your style.
Simple animal print techniques: Create leopard spots by painting irregular circles and adding smaller dots and "C" shapes around them. For zebra stripes, paint wavy black lines on a nude or white background. You can also create cow print using irregular black and white shapes.
Color variations: While traditional animal prints use natural colors, don't be afraid to experiment with bright colors or pastels for a unique twist on these classic patterns.
9. Negative Space Designs
Negative space nail art leaves part of your natural nail exposed, creating modern, artistic designs that are both trendy and easy to execute.
Creating negative space: Use striping tape to create geometric shapes, then paint around the tape. When you remove the tape, the natural nail will show through, creating the design. You can also use hole reinforcement stickers to create perfect half-moons or other curved designs.
Benefits of negative space: These designs last longer because the exposed nail doesn't chip as easily as painted areas. They also look great as they grow out, making them perfect for low-maintenance beauty routines.
10. Seasonal and Holiday Designs
Celebrate different seasons and holidays with simple themed nail art that adds festive flair to your fingertips.
Seasonal ideas: Pastel colors and floral designs for spring, bright colors and tropical patterns for summer, warm earth tones and leaf designs for fall, and icy blues, whites, and holiday-themed designs for winter.
Holiday-specific designs: Simple hearts for Valentine's Day, pastel colors and Easter egg patterns for spring, red, white, and blue designs for patriotic holidays, and festive patterns for Christmas and New Year's celebrations.
Tips for Perfect DIY Nail Art
Creating beautiful nail art at home is easier when you follow some basic guidelines and techniques.
Preparation is Key
- Start with clean, shaped nails: Remove old polish, trim and file your nails, and push back cuticles for a professional canvas
- Use a good base coat: This protects your natural nails and helps polish adhere better
- Apply thin coats: Multiple thin coats dry faster and look more even than one thick coat
- Let each layer dry: Patience is crucial for preventing smudges and achieving clean designs
Troubleshooting Common Issues
- Smudges: Use a small brush dipped in nail polish remover to clean up edges
- Bubbles: Avoid shaking your polish and apply thin coats to prevent bubbling
- Chipping: Use a quality top coat and reapply every few days to extend your manicure's life
- Uneven application: Use a white base coat under bright colors to make them pop
Maintenance Tips
- Apply cuticle oil daily: This keeps your cuticles healthy and extends the life of your manicure
- Wear gloves for household chores: Protect your nails from water and harsh chemicals
- Touch up as needed: Keep your polish handy for quick fixes when chips occur
- Remove properly: Use acetone-free remover to prevent drying out your nails
Conclusion
Cute easy nail art ideas prove that you don't need to be a professional or spend hours at a salon to have beautiful, stylish nails. From classic polka dots to modern geometric patterns, there's a design for every skill level and personal style. The key is to start simple, practice your technique, and have fun experimenting with different colors and patterns.
Remember that nail art is meant to be enjoyable and expressive. Don't worry about perfection - even the most skilled nail artists started as beginners. With the right tools, a little patience, and these easy techniques, you'll be creating Instagram-worthy nail art in no time.
So why not try one of these cute easy nail art ideas today? Whether you're preparing for a special occasion or just want to add some flair to your everyday look, these simple designs will help you achieve beautiful nails that express your unique personality. Happy painting!